How to Install and Activate Digital Products Maker Extension (Step-by-Step with Screenshots)
Welcome to the premier AI-driven workstation designed for digital product creators! Whether you are building profitable Amazon KDP low-content books, intricate coloring books, productivity digital planners, or viral Etsy printables, this visual guide will teach you how to install and activate digital products maker Chrome extension quickly and effortlessly.
The Digital Products Maker extension is your automated co-pilot, enabling fast browser-native generation of high-margin assets, interior page generation, and direct cloud exports.
📋 Prerequisites Before You Begin
Ensure you have the following ready before starting:
- A Chromium-based Web Browser: Google Chrome (recommended), Microsoft Edge, Brave, or Opera.
- An Active Digital Products Maker Account: Your verified license key available in your Portal Dashboard.
- An Internet Connection: Required to download the latest extension package and authenticate your device license.
🚀 Steps to Install and Activate Digital Products Maker (10 Illustrated Steps)
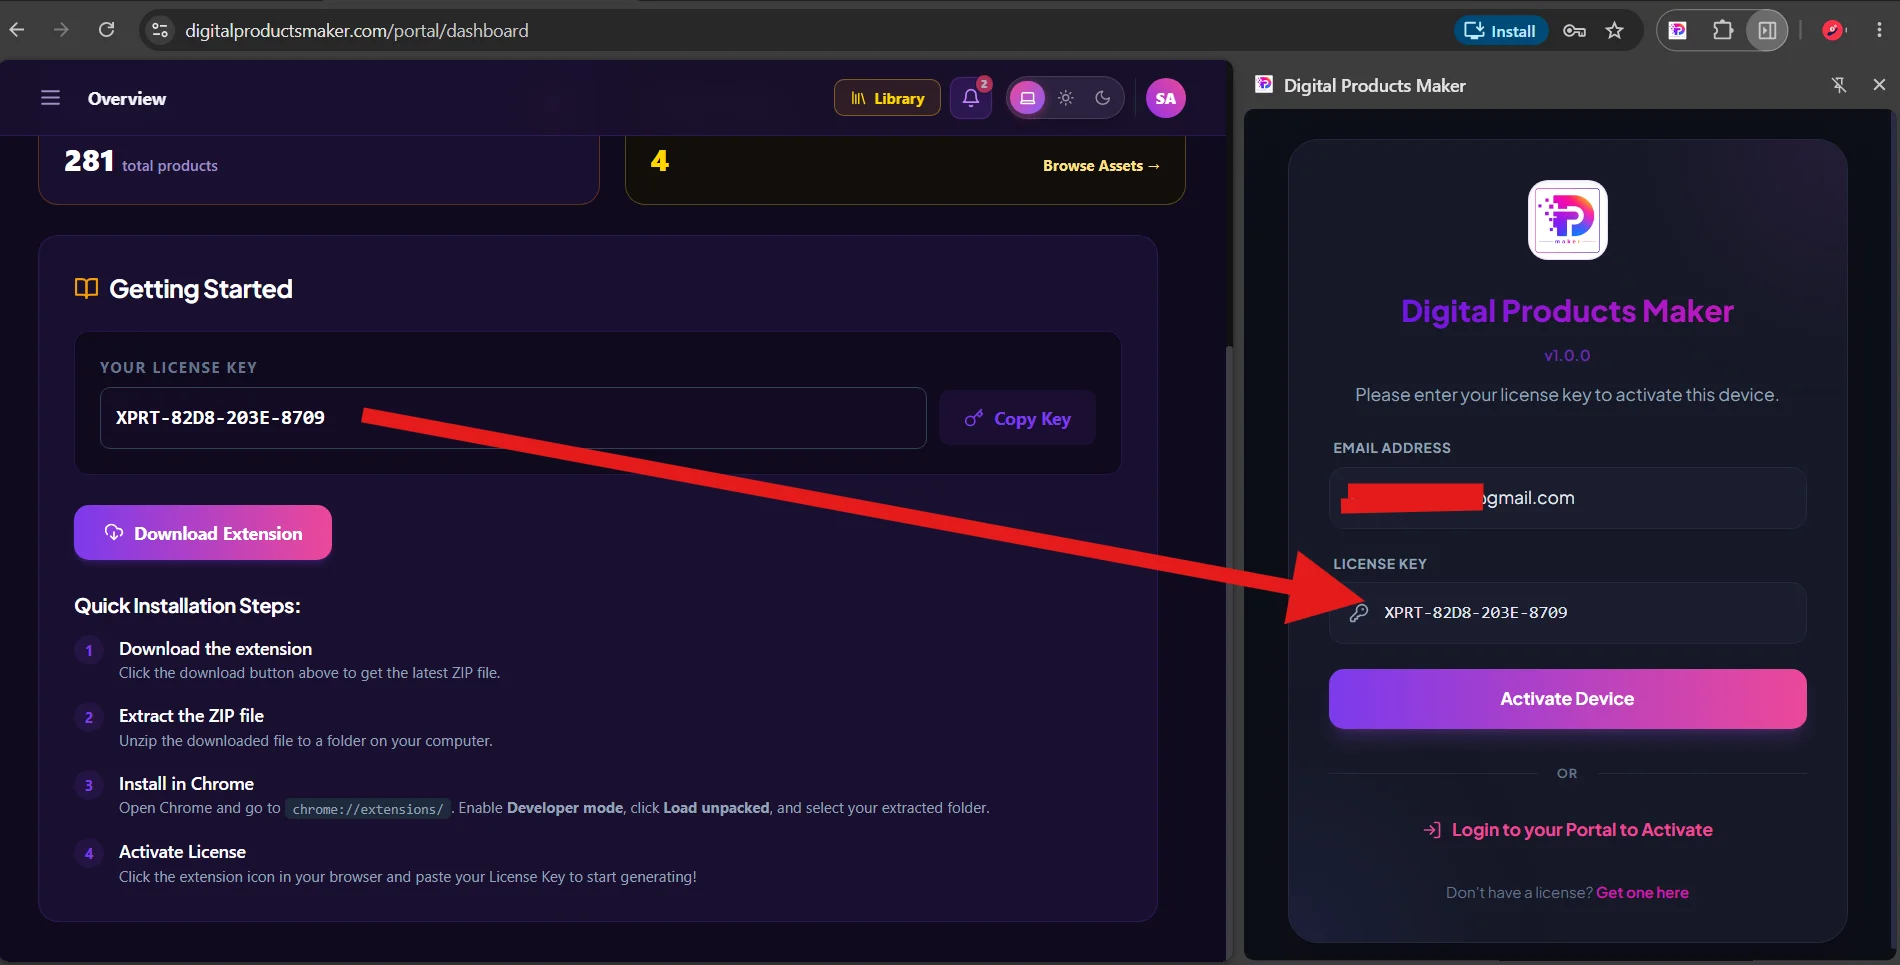
Step 1: Open Your Dashboard, Copy License Key & Download Extension
Navigate to your member dashboard at:
👉 https://digitalproductsmaker.com/portal/dashboard
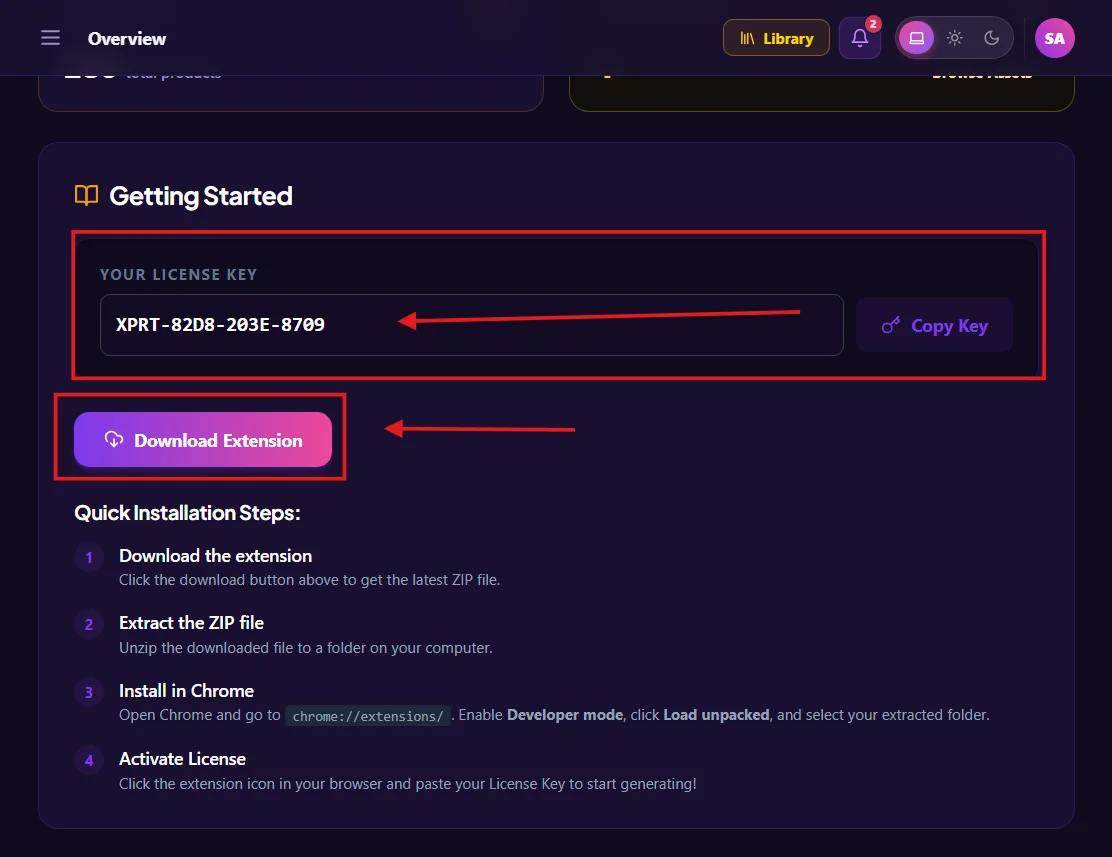
Under the Getting Started panel, you will locate:
- YOUR LICENSE KEY: Click the Copy Key button to copy your unique 16-character license string (e.g.,
XPRT-82D8-203E-8709). - Download Extension Button: Click the purple Download Extension button to download the latest
extension.zipfile to your computer.
💡 Pro Tip: Keep your license key copied or saved in your clipboard. You will need it in Step 10 to link this browser installation to your cloud quota.
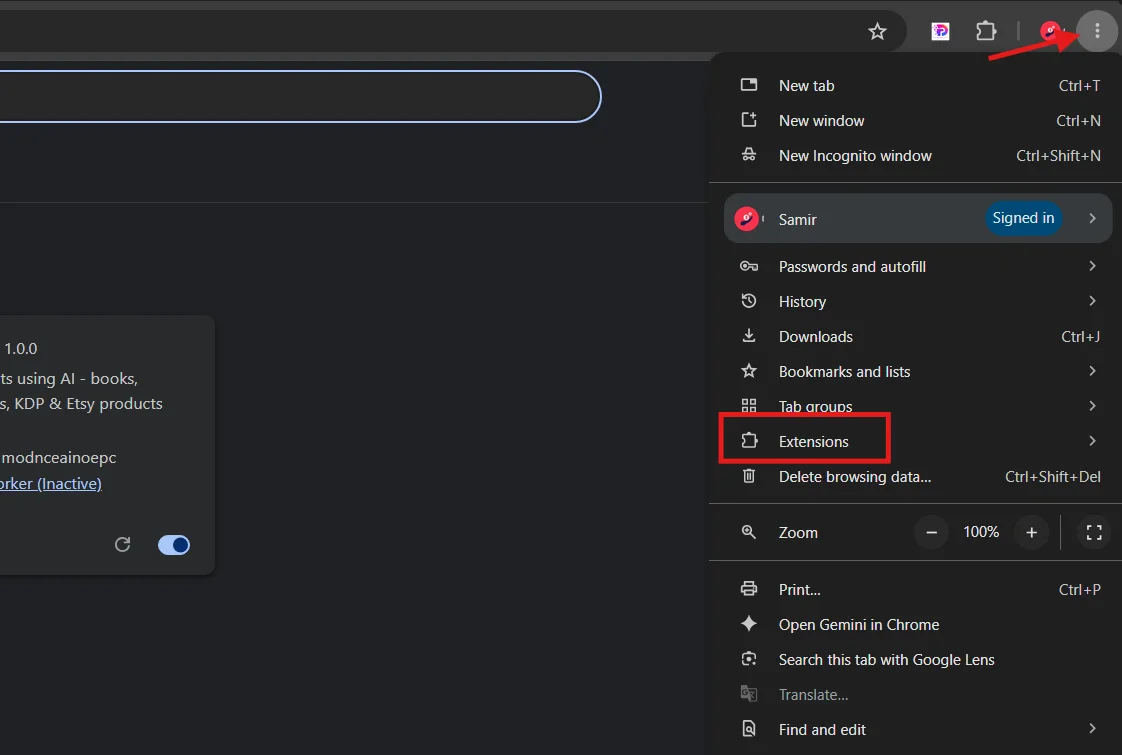
Step 2: Access the Chrome Menu
Open your Google Chrome browser:
- Click the three vertical dots (⋮) menu icon located in the upper right-hand corner of the browser window.
- Hover over the Extensions menu item.
Step 3: Open the Manage Extensions Manager
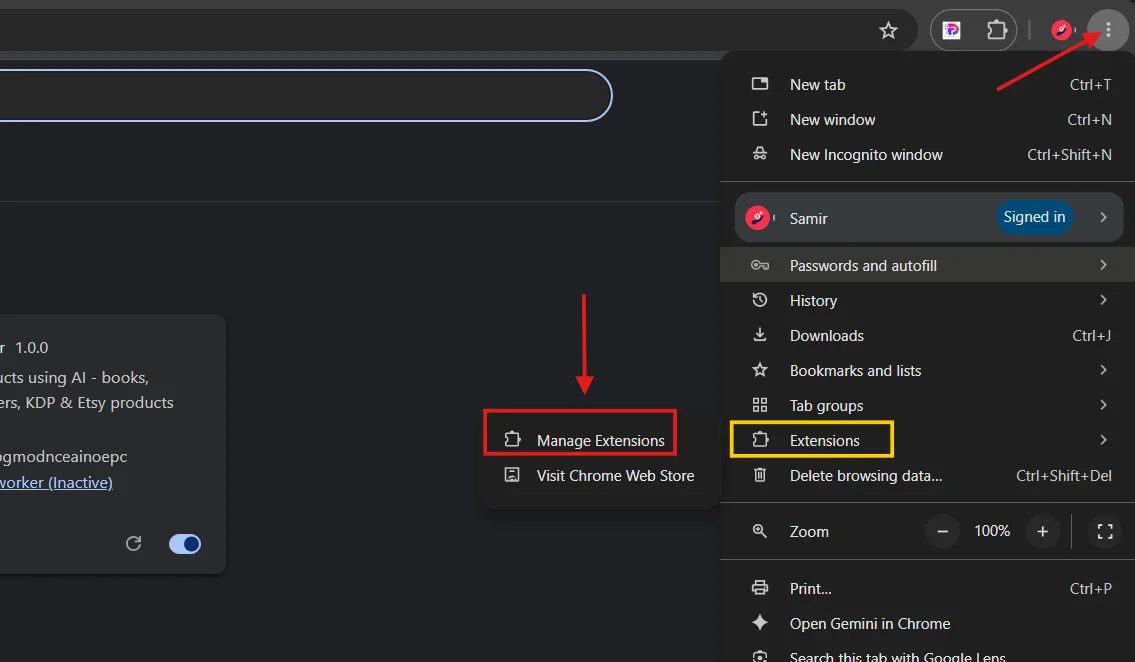
In the secondary flyout menu that appears:
- Click Manage Extensions.
- Alternatively, you can jump directly to this page by entering
chrome://extensions/into your Chrome address bar and pressing Enter.
Step 4: Enable Developer Mode in Chrome
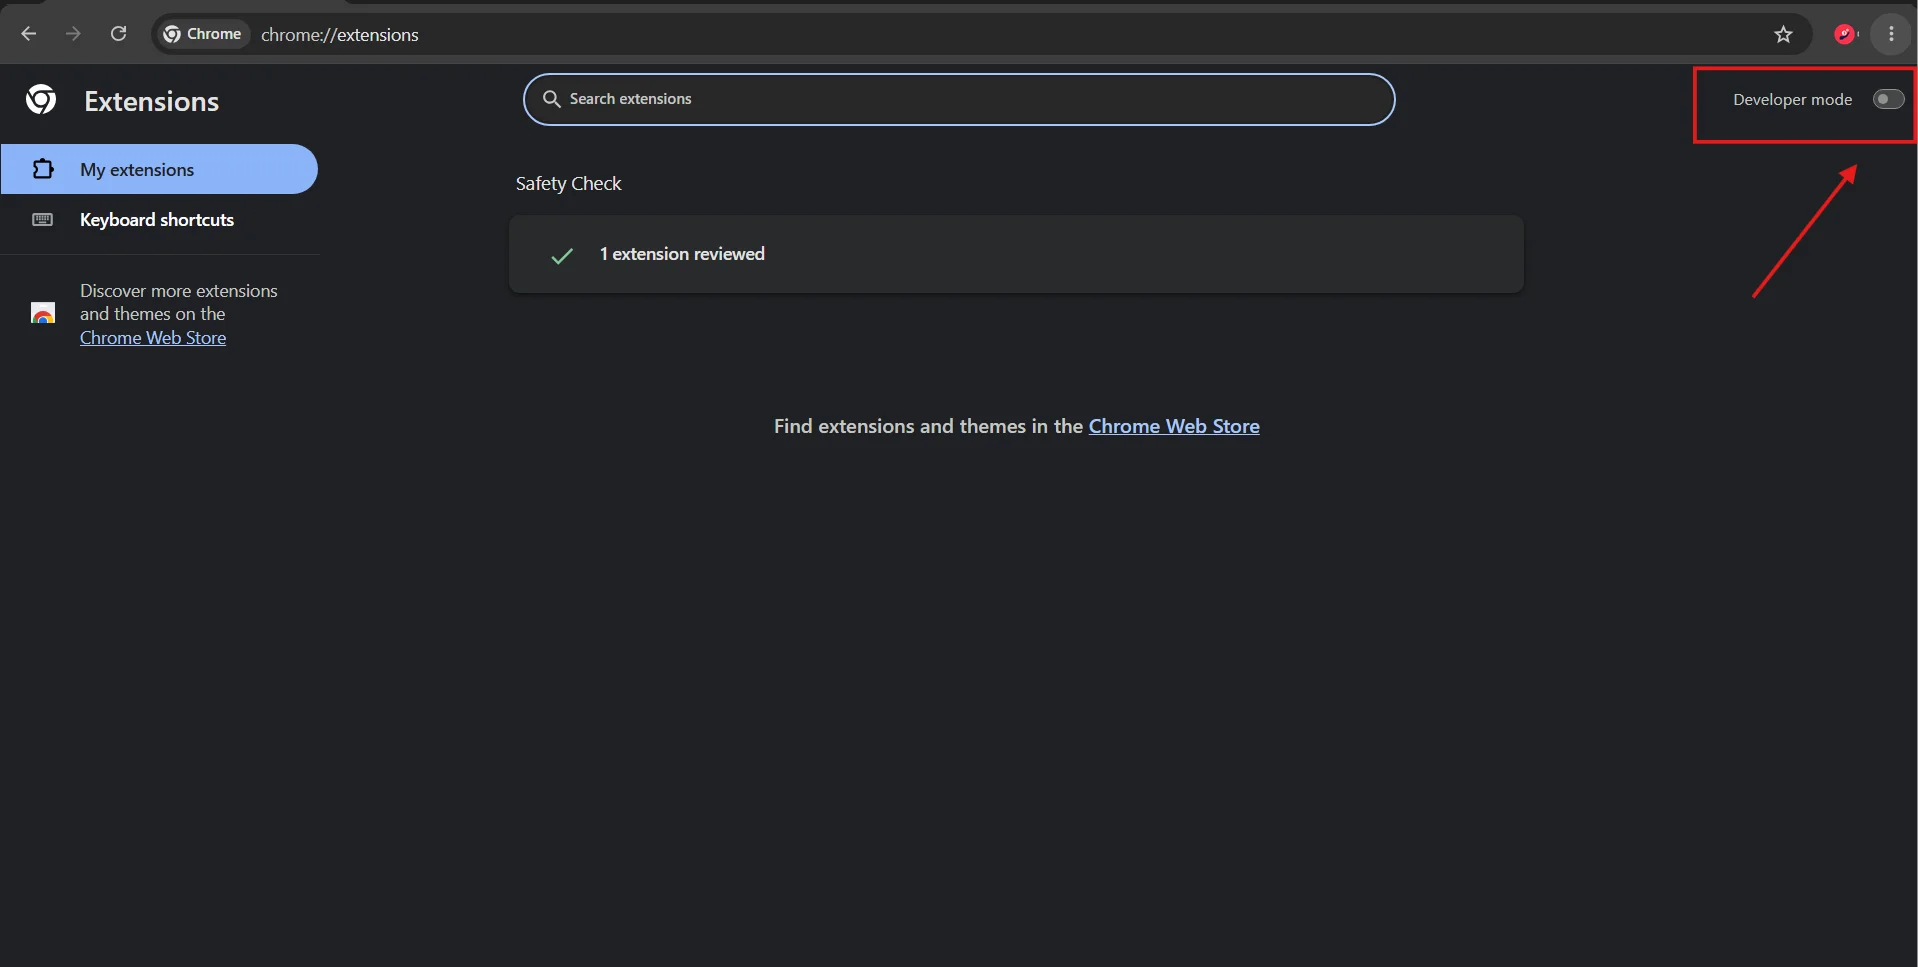
Look at the top-right corner of the chrome://extensions/ page:
- Locate the Developer mode toggle switch.
- Toggle the switch to the ON position (it will turn blue).
- You will notice new action buttons appear in the top sub-bar:
Load unpacked,Pack extension, andUpdate.
⚠️ Security Notice: Enabling Developer Mode is safe and standard practice for installing direct professional extensions and proprietary tools with rapid deployment cycles.
Step 5: Drag the Extension Package into Chrome
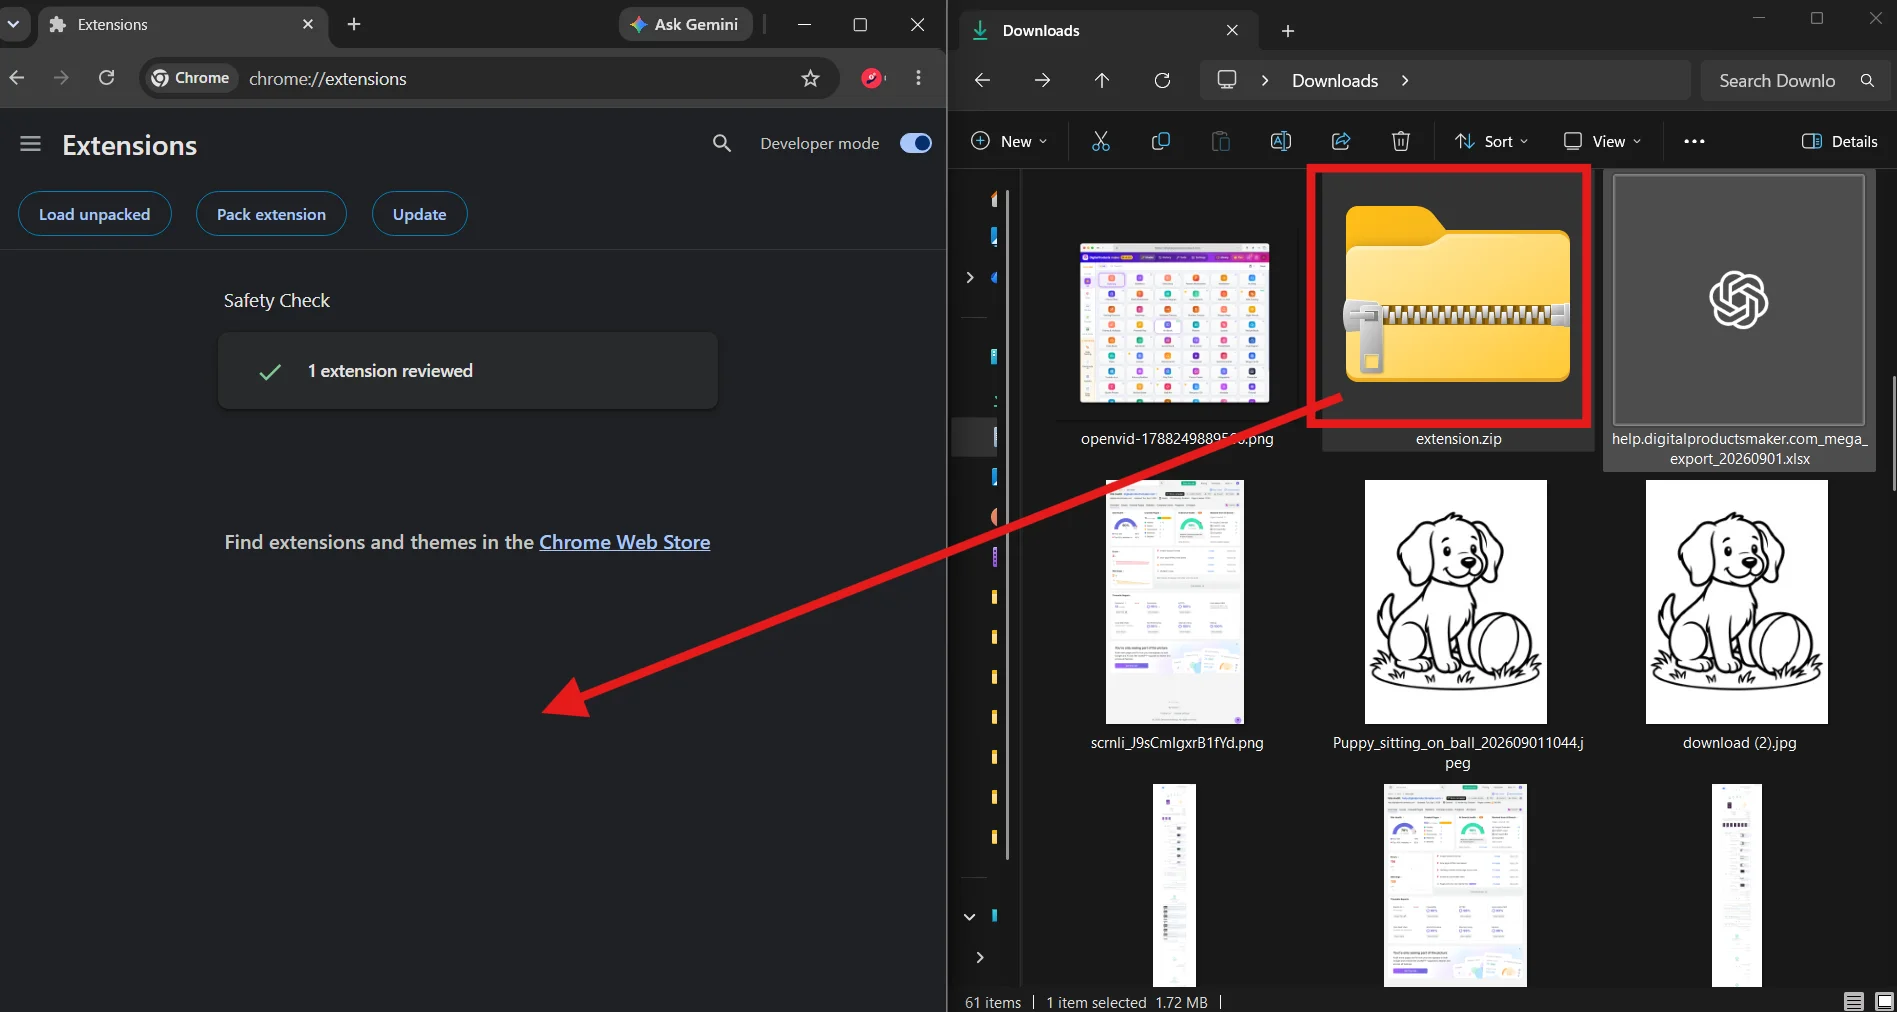
Organize your desktop windows so that your Downloads folder is visible side-by-side with your Chrome browser window:
- Locate the downloaded
extension.ziparchive (or its extracted folder). - Click and drag the file directly across onto the open
chrome://extensions/tab.
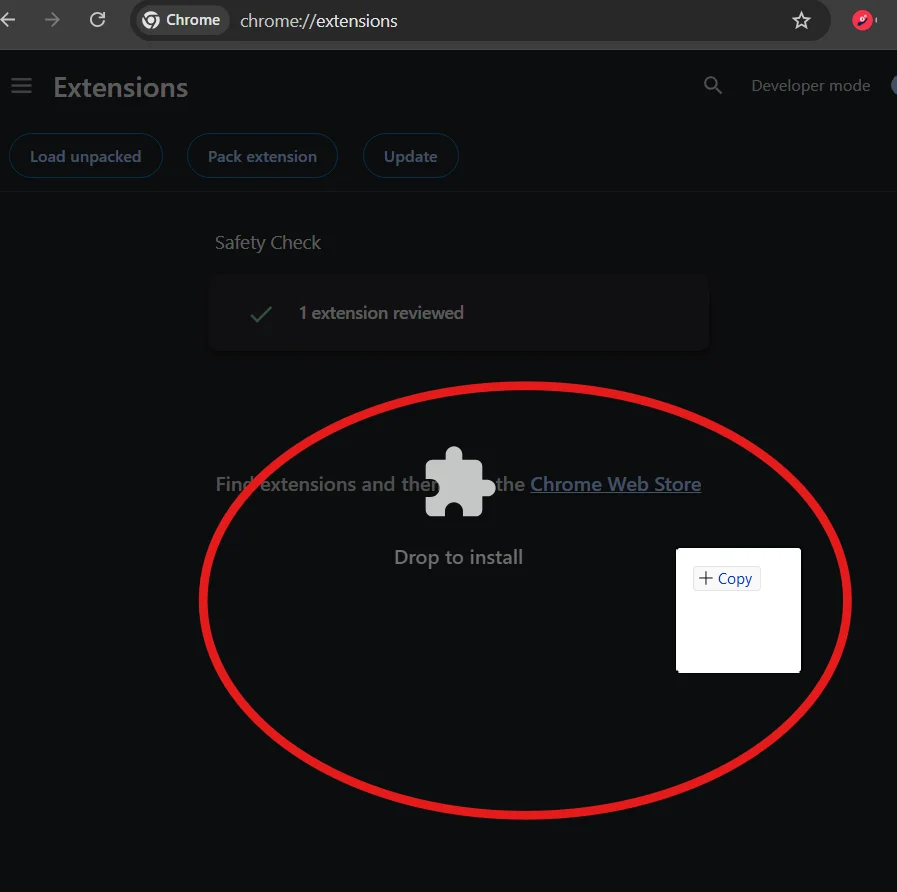
Step 6: Drop the File to Trigger Instant Installation
As you drag the file over the extensions page:
- A circular drop overlay with a puzzle piece icon will appear displaying Drop to install.
- Release your mouse button to drop the package.
- Google Chrome will instantly unpack, verify, and register the extension in under two seconds.
Step 7: Confirm Installation and Active Status
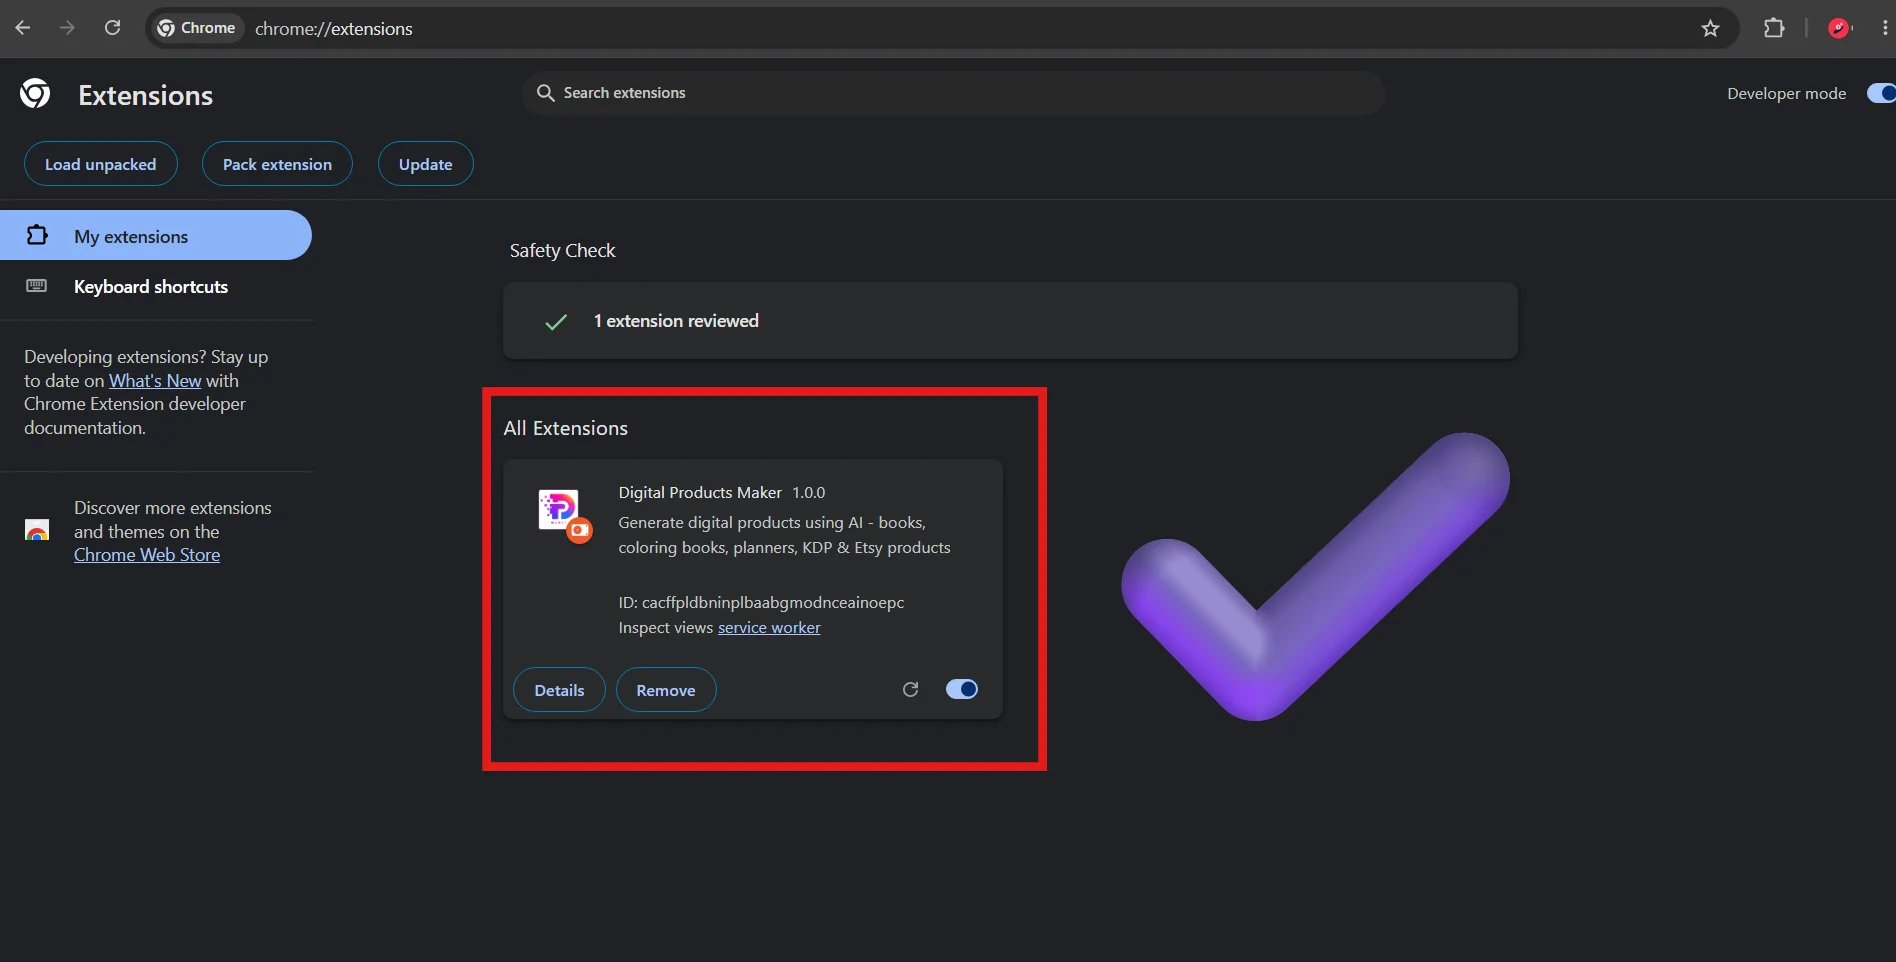
You will now see the official Digital Products Maker (v1.0.0) card listed in your installed extensions:
- Verify that the toggle switch in the bottom-right of the card is switched to Active / ON.
- The extension summary confirms: "Generate digital products using AI - books, coloring books, planners, KDP & Etsy products".
Step 8: Pin the Extension to Your Browser Toolbar
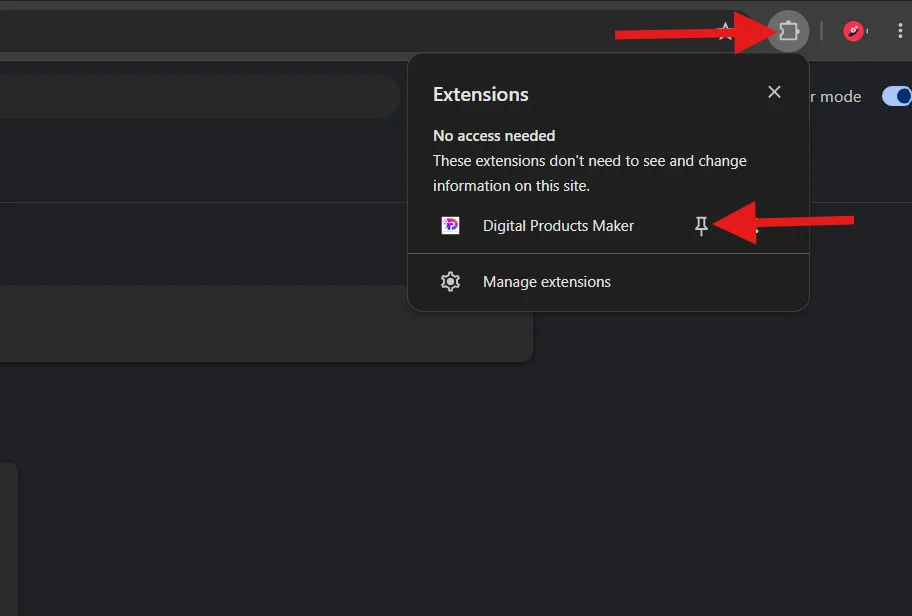
To ensure instant 1-click access while researching niches or generating assets:
- Click the Extensions (Puzzle Piece) icon on the Chrome top bar.
- Find Digital Products Maker in the extension list.
- Click the Pin icon next to it. The vibrant Digital Products Maker icon will now stay permanently visible in your toolbar.
Step 9: Launch Extension and View the Activation Window
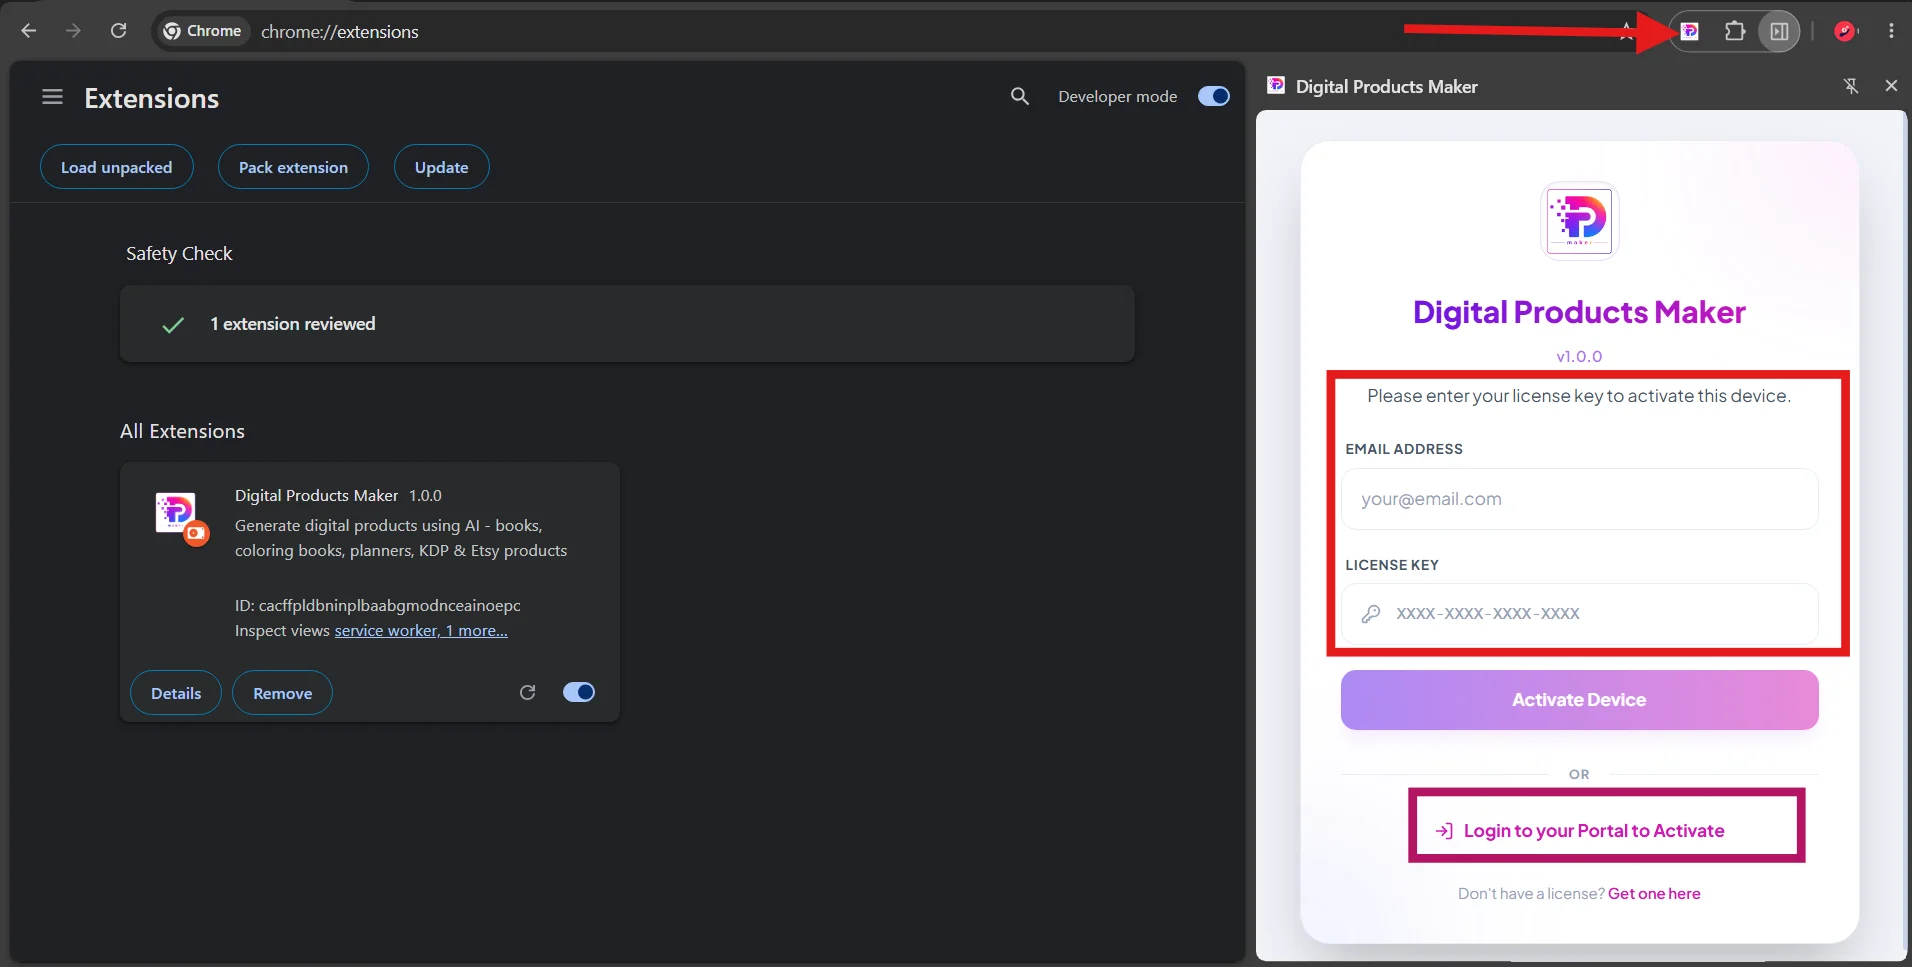
Click the newly pinned Digital Products Maker icon in your browser toolbar:
- The sleek extension side-panel will open.
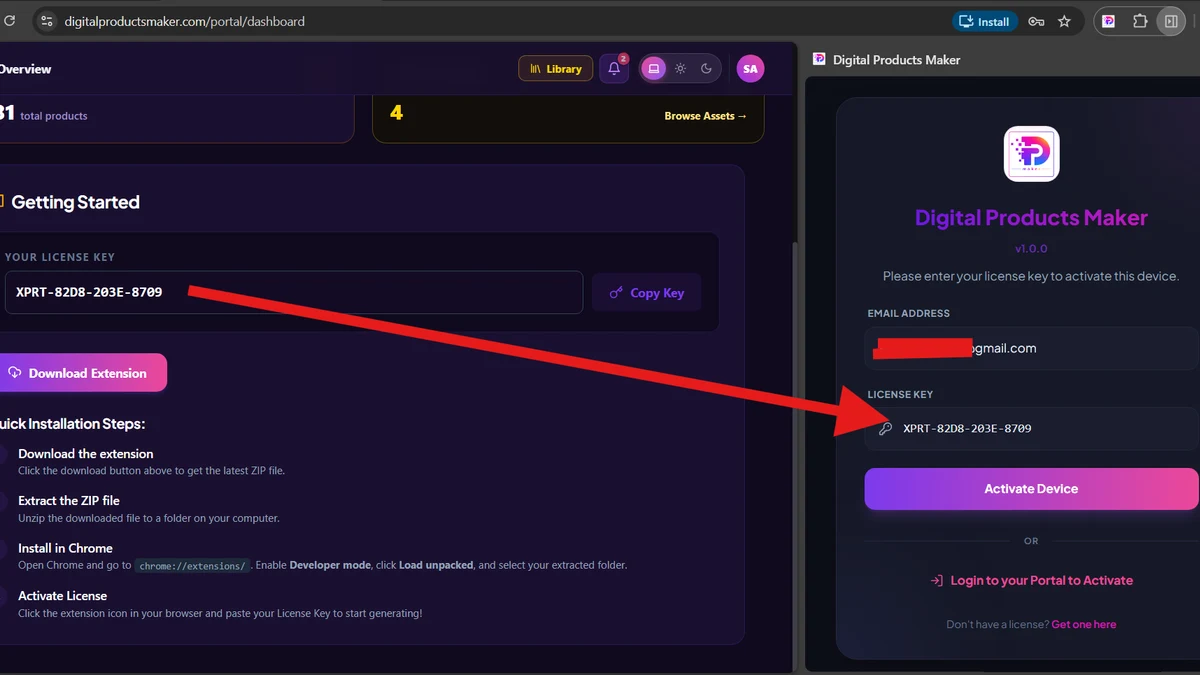
- You will be greeted with the prompt: "Please enter your license key to activate this device."
- You will see two primary inputs:
- EMAIL ADDRESS: The email associated with your account purchase.
- LICENSE KEY: The activation key copied in Step 1.
Step 10: Input Credentials & Click Activate Device
Complete the final setup step:
- In the EMAIL ADDRESS field: Type your registered account email.
- In the LICENSE KEY field: Paste your copied license key (
XPRT-XXXX-XXXX-XXXX). - Click the vibrant gradient button: Activate Device.
- (Alternatively, you can click the
Login to your Portal to Activatebutton for instant OAuth single-sign-on).
🎉 Success! Your browser instance is now authenticated, verified, and unlocked. You have full access to all AI product generators, interior layout engines, cover designers, and direct export pipelines!
🛠️ Frequently Asked Questions & Troubleshooting (FAQ)
Q1: What should I do if I get an "Invalid License Key" error?
- Ensure there are no accidental trailing or leading spaces when pasting the key.
- Verify that the email entered exactly matches the email on your Digital Products Maker order.
- Check your active device limits in the Portal Dashboard. If you have reached your plan limit, simply revoke an old device with one click.
Q2: Do I need to keep Developer Mode turned on?
Yes, keep Developer Mode enabled so that Chrome continues running unpacked extensions and allows seamless background synchronization.
Q3: How do I update to newer versions of the extension?
When a new version is released, simply download the new bundle and drop it onto your extensions page, or click the Update button at the top of chrome://extensions/.
Q4: Does the extension work on Mac, Windows, and Linux?
Yes! The extension is fully operating system agnostic. It runs smoothly on any desktop running Google Chrome, Brave, Edge, or Chromium on macOS, Windows, Linux, and ChromeOS.
🎯 Next Steps: Build Your First AI Digital Product
Now that your workspace is set up and active, explore these in-depth guides to launch your first winning product: